

Javascript And How To Make An Animated Sprite Image Disappear?
How to build a unproblematic sprite animation in JavaScript

In this article we volition build a quick and elementary sprite animation in JavaScript without using any external libraries.
The consummate lawmaking and the final result can be viewed on JSfiddle.
For this simple example nosotros will be using JSFiddle , a gratuitous online editor (null to download or login) to build the code. We will code in elementary CSS, HTML and JS for this instance, and volition build the animation footstep-by-step.
Step 0: Choice a Sprite image
You can exercise this via a uncomplicated Google search for "sprite animation" and by going to the Images tab of the search results and choosing an image.
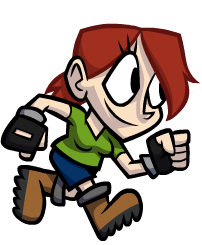
For our test example I used the following image that I came beyond via search.

(Copyright disclaimer: This prototype is being used for educational purposes only)
Image Credit: Andreas Loew , creator of TexturePacker https://www.codeandweb.com/texturepacker
If you want to use your own image you lot tin can upload the image to a service like https://imgbb.com/, which is a free prototype hosting service (no login required), and information technology volition give yous a link for your paradigm. Once more make sure information technology is the link to the image (i.e. your paradigm URL should stop with a .jpg or .png).
What is a Sprite Image or a Sprite Sheet?
A sprite image is simply a unmarried prototype file (in .jpg or .png) which has multiple drawings within that single image. Such images are called sprite sheets . Image1 (shown above) is a unmarried sprite image (i.e. a single .png file), which has six figures drawn within it (It is non six carve up files but a single file).
The idea behind using a sprite image is to utilise one single image that contains all animations of a character instead of dealing with multiple server calls to multiple single files. Thus instead of storing each animation frame in divide files, and having to practice multiple server calls to fetch each file to render the animation, a sprite canvass tin can instead store all the animation in a single prototype file that is downloaded once (simply one server call) when the page is loaded. This provides less web latency since the entire file is bachelor to the browser when the page first loads, leading to a faster and smoother animation.
Step 1: The CSS and HTML file
We will keep our CSS and HTML files very elementary and volition build them footstep-by-step to achieve a dynamic animation.
Open JSFiddle and write the following lawmaking in the HTML and CSS sections:
HTML Code
          <div id="demo">
            <p id="prototype"> </p>
</div>
HTML Code: We are simply adding a <div> element which has a <p> element. And we associate "id" with each of them.
CSS Code
          #paradigm {
            height: 256px;
            width: 256px;          background:
url('https://cdn.codeandweb.com/blog/2016/05/10/how-to-create-a-sprite-sheet/spritestrip.png') 0px 0px;
}
CSS Code: Here nosotros ascertain a CSS identifier called "image" (which corresponds to the <p> tag id="image"). Nosotros and then gear up the height and width within the CSS file to 256px. And we add together a groundwork image, that we fetch using the URL. The groundwork prototype is the sprite epitome that we desire to apply (In our example it is the URL to the spritestrip.png file that nosotros want to apply). Note that the height and width values stand for to the meridian and width to get just the first slice from the 6 figures within the image file.
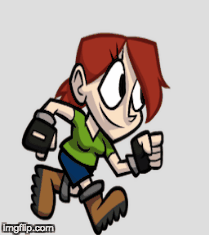
Thats it! Now run the JS in the JSFiddle Editor. You should see the following static image in the upshot browser. This is the get-go section from the sprite image sheet.
Brand certain to grab the direct image link (It should not link to the website simply to the actual image) Eg: https://cdn.codeandweb.com/web log/2016/05/10/how-to-create-a-sprite-sheet/spritestrip.png
Also note that for the purposes of this demo, you do not need to download the image to your computer. For now, you can access the paradigm directly using the URL above.
Troubleshooting
If you are using a different prototype and the image does not show up, make certain to:
- (a) check the URL and brand sure it is the URL to the bodily image i.e. ending in .png or .jpg;
- (b) adjust the meridian and width in the CSS file to the correct dimensions for your image, such that only the first blitheness slice from the sprite sheet is visible.
In my case the dimensions of the sprite sheet were (width)1536px * (top) 256px. And, since there are 6 animation sections in the single row, each epitome is 1536/6 = 256px in width. Yous volition have to do the appropriate adding to get the first image when using your own sprite sheet.
Step 2: The JavaScript Code
Now let u.s. write some bones JavaScript code within the JavaScript section of the JSFiddle. We begin past writing a JavaScript office that we will call animateScript() , which volition expect something like this:
JavaScript Lawmaking
          function animateScript() {          document.getElementById("paradigm").style.backgroundPosition =
`-256px 0px`;          }
JavaScript Lawmaking: All nosotros are doing is getting the <p> tag element using document.getElementById("image"), and changing the backgroundPosition width by -256px, keeping the top the aforementioned 0px. Notice too that I am using the new ES6 back ticks i.e. ` , instead of the regular quotation i.e " , to enclose the string `-256px 0px`. The reason for this volition get clear in the next stride.
At present lets connect the HTML with the JavaScript function we created by calculation the onmouseover consequence to the <p> tag.
HTML Lawmaking (Final)
          <div id="demo">
            <p id="prototype"            onmouseover="animateScript()">  </p>
</div>
HTML Lawmaking: At present on mouse over of the <p> chemical element the animateScript() function will be executed and the image display will be shifted by -256px, thereby showing the second paradigm in the sprite canvass when the mouse is over the <p> tag.
That Information technology! At present run the JS in JSFiddle, and you volition see the first epitome (Image A). At present when you mouse over on the paradigm you lot volition meet the paradigm animative to the 2nd prototype.

Troubleshooting
In case you are getting an error on JSFiddle "animateScript() role non divers" when yous mouse over on the image, you lot can fix this by doing the following. In the Javascript pane of the JSFiddle click on the dropdown where it says "JavaScript (No-Library (pure js))" . Here click on LOAD TYPE (where it probably says "on Load") and choose instead "No wrap in <trunk>".
Basically what is happening here is that JSFiddle is unable to connect to the JS function to the HTML code, since the DOM element does not be onLoad, and hence yous need to adapt the JSFiddle settings to Load Type: No Wrap in Body.
Footstep 3: Lets Animate!
Awesome! If you have gotten thus far you accept already achieved some basic animation of the image using mouse over. Let us now enhance our JavaScript code so that we accept a smooth continuous animation looping through all the six figures on mouse over.
For this nosotros will use the JavaScript function setInterval() to loop through each prototype. We will demand to shift the position of the image slicer by 256px (in the instance of our demo image) so that at every interval the next slice of the image is displayed. Accordingly permit united states make the following updates to the JavaScript code:
JavaScript Code (Final)
                      var tID;            //we will use this variable to clear the setInterval()          part animateScript() {                      var    position = 256;            //showtime position for the image slicer
            const  interval = 100;            //100 ms of interval for the setInterval()                      tID = setInterval ( () => {                    document.getElementById("paradigm").style.backgroundPosition =
`-${position}px 0px`;
//we use the ES6 template literal to insert the variable "position"                      if (position < 1536)
{ position = position + 256;}
//we increment the position by 256 each fourth dimension
            else
{ position = 256; }
//reset the position to 256px, once position exceeds 1536px                      }
,            interval            ); //end of setInterval          } //terminate of animateScript()
JavaScript Code: So all we accept really done in this code is movement the "document.getElementById("epitome").style.backgroundPosition" inside the setInterval() function. Also we have introduced a variable called "position" that allows the "width" of the backgroundPosition to now be a variable instead of a static. Nosotros too used a variable called to set the fourth dimension of the interval of the setInterval() to 100ms. Thus, now every 100ms the backgroundPosition is updated by 256px to display the next image in the animation leading to a fully blithe image on mouseover.
That's information technology! 🎉 Now run the JS lawmaking in JSFiddle, and mouse over onto the image, and see the sprite run!
Pace 4: Some Cleanup (Optional)
We can improve the JavaScript by calculation a stopAnimate() role on mouseout, as follows:
JavaScript Lawmaking
          var tID; //we will utilise this variable to clear the setInterval()                      function stopAnimate() {                                clearInterval(tID);
}            //cease of stopAnimate()          part animateScript() {          var    position = 256; //get-go position for the epitome slicer
const  interval = 100; //100 ms of interval for the setInterval()
            const  unequal = 256;            //diff equally a variable for position offset          tID = setInterval ( () => {          document.getElementById("prototype").style.backgroundPosition =
`-${position}px 0px`;
//nosotros employ the ES6 template literal to insert the variable "position"          if (position < 1536)
{ position = position +            unequal;}
//nosotros increment the position by 256 each fourth dimension
else
{ position = 256; }
//reset the position to 256px, once position exceeds 1536px          }
, interval ); //finish of setInterval          } //end of animateScript()
HTML Code
          <div id="demo">
            <p id="image" onmouseover="animateScript()"            onmouseout="stopAnimate()">          </p>
</div>
Thus, now the blitheness stops when you mouse out of the image. 👍
Concluding remarks
The concluding code and animation tin can exist found on JSFiddle here!
Notice that the reward of using sprite animation is that nosotros make only i server call , which is the initial call by the CSS to get the sprite image. One time the prototype is downloaded the animation is smooth, irrespective of the internet connection, since the unabridged prototype is available to the browser.

Found this useful? Hit the 👏 push button to show how much you lot liked it! 🙂
Follow me on Medium for the latest updates and posts!
Read Next: What is a Webhook?
Other Articles:
- Promises in Javascript Explained!
- Javascript — Closures Simplified!
Source: https://medium.com/dailyjs/how-to-build-a-simple-sprite-animation-in-javascript-b764644244aa
Posted by: davisretraid1949.blogspot.com
0 Response to "Javascript And How To Make An Animated Sprite Image Disappear?"
Post a Comment